Backstory
In 2015 I was bit by the Land Cruiser bug. Having “just” my 2011 Toyota Tacoma to play in, and it being a somewhat expensive vehicle to damage offroad, I decided a second rig was in order. While Land Cruisers are legendary for their reliability, the 80 Series is perhaps the pinnacle of Toyota’s offroad engineering efforts. Overbuilt in virtually every aspect, sporting a solid front axle with birfields, and a full-floater rear axle, they are extremely tough and capable. In my opinion, the combination of capabilities, reliability, and comfort in the 80 Series is simply hard to beat at any price point. I quickly found a 1993 Triple-locked FZJ80 with 234k miles and all the goodies already installed. I went ahead and bought the rig, and the seller has since become a friend of mine, that will become an important fact later in the story.
After getting the rig home, driving it for a while, performing significant maintenance and upgrades on it, I decided that keeping the Tacoma was a bit foolhardy because it just sat in the driveway while I drove the 80 all the time. Luckily, we were also looking at ditching our Acura MDX and in the end, traded the Tacoma towards a nice T4R Limited. Win!
As I drove the 80 more and more, and how much I loved the vehicle became clearer to me, an opportunity arose. My Land Cruiser crack dealer, the friend I referred to earlier in the story who sold me the 1993, let it be known he may be willing to part ways with a 1997 with only 112k on it. Seriously, 112k miles? After thinking for all of about 30 seconds, then spending days making sure I was making a good choice, I bought it. The intent was to start with a totally clean slate, low mileage, and well cared for rig, and make it something special. Ultimately, once the 1997 was complete, the 1993 would be sold and go to a good home where it would get the use it deserved. And so the project began…
Scope of Project
As I said, the idea of working with a clean slate was very appealing. Regardless of the quality of work done on a rig before you buy it, you still may never know all that was done to it or the true quality of work and parts. I am a big fan of OEM parts, and I like to only do things once, and the “correct” way. So, based on this, I developed some project goals as follows:
Reliability – The first order of business on a 20-year-old truck, regardless of the low mileage, is to baseline it. Fluids, belts, hoses, filters, mechanical, etc., all of it needs to be gone through and likely changed before true reliability can be achieved.
Performance – While many builds occur in multiple distinct phases, this one was far simpler. I knew that 37” tires were my goal, so whatever that took, needed to be done. This was to be DD capable, yet handle any use I could throw at it off-road. I am not a person that just adds 37’s to the mix and hopes for the best. Axles, gears, suspension, and a variety of other modifications and upgrades must be considered and applied to achieve a reliable and driveable vehicle. This is no trailer queen so driving the interstate for hours on end, towing a trailer, and overall comfort are key factors and add great time and expense over a simple off-road build.
Budget – Well, considering items #1 and #2 above, you must be realistic. Sure, OEM parts are readily available, but they aren’t cheap. And really, it’s a Land Cruiser, parts were never cheap, especially 20 years later. Some parts are simply not available new so used or substitute parts must be sourced. In the end, setting a budget was easy, spend what needed to be spent to achieve items #1 and #2 above. Each part or bit of work was evaluated for cost, purpose, and ultimately priority. I spent what I believed was needed to achieve my goals because in the end, if I failed to achieve either of them, then the project would be a failure in my eyes. If I wasn’t willing to commit to what legitimately needed to be done, why even bother at all?
Base Rig
1997 Toyota Land Cruiser FZJ80
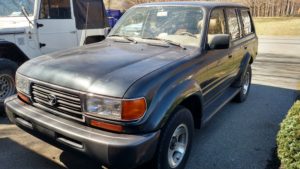
Key features of this rig:
- Only 112k miles when bought (versus most @ 200k or more)
- Virtually rust-free
- No factory rack (prone to rust @ mounts)
- Interior was in above-average condition
- Mechanically sound, maintenance appeared good, and no glaring issues
- It’s green, hence the name “Project Evergreen”
The Build Plan
Moving forward, and committing to do what it took to meet the project goals, I started putting the specifics together. There is a LOT of detail in the following write-up so while some may simply want to skip ahead t the results, I hope others find knowledge and inspiration in the details, because I have fielded a ton of questions around my build and here is where I hope to benefit the Land Cruiser and off-road community the most, with details and explanations on why I did what I did. Google-Fu being what it is, actual knowledge is pretty hard to come by. There simply aren’t that many detailed write-ups on this platform when going past the popular 35” tire FZJ80 build and moving to the world of 37” tires. It is different, and to know that up front is key to delivering a successful result.
Planning & Labor Resources
RnR Auto – All good intentions aside, I had to be realistic. While I was capable of doing a large amount of the required work myself, time is simply the largest factor. Couple that with not having a garage or other climate-controlled area to work in, I knew I needed help. Enter Rick Collins at RnR Auto in Pasadena, MD. To say Rick was invaluable would be doing him a disservice. He is the first and foremost reason this project got done, and was so successful. His knowledge, and mechanical skill made this project go as well as one could hope to expect. While not traditionally a Land Cruiser guy, he learned along the way, and with my providing information, guidance, and just generally being a pain in the ass, he made it happen. Kudos to him taking on a project that aside from previous work he did on my 1993 FZJ80, was pretty much an unknown quantity when we started. Skipping right to the end result, the rig drives like a dream and has handled the trails I have thrown at it with ease, no small achievement, particularly given the VERY large scope of work!
Build Specifics
Suspension & Steering
- Autocraft Slinky Long Travel Suspension with Icon Stage 1 Shocks
- Metal Tech Rear Upper and Lower HD Control Arms
- Slee Rear Coil 1” Spacer
- Slee Front and Rear 2” Bump Stop Extenders
- Ironman Front & Rear Panhard Bars
- Slee HD Tie-Rod & Drag Link
- FJ80 Front Sway Bar with new OEM bushings
- Wit’s End Front Axle Caster Plates
- Wit’s End Front and Rear Sway Bar Extensions
- Roger Brown 1” Body Lift – Ultimate Kit
- Old Man Emu HD Steering Stabilizer
- OEM Front Control Arm Bushing Set
Drivetrain
- Revolution 5.29 Gears from RnR Auto
- Harrop E-Lockers from Forge Specialties
- Nitro Front and Rear Chromoly Axle Shafts
- Toyo 37×13.50r17 Open Country M/T’s
- SCS F5 17×9 Wheels (3.5″ BS) in Bronze
- Terrain Tamer Rotors & Brake Pads from Land Cruiser Parts & Specialties
- Slee Offroad Extended Stainless Steel Brake Lines
- Wit’s End Tacoma Modified Front Double-Cardan Driveshaft
Armor, Cargo, & Recovery
- ARB Front Bumper
- Iron Pig Offroad Rear Bumper with Tire Carrier
- Iron Pig Offroad Skid Plate & Crossmember
- Metal Tech Rock Sliders
- Engo SR12s 12k Winch
- Prinsu Roof Rack
- ARB Outback Rear Drawer Roller & Storage System
Electronics
- Switch-Pros SP8100 8-Switch Panel Power System
- Cobra 75 CB Radio
- Midland Micromobile MXT115 2-Way Radio
- Various Blue Sea Systems Components
- Joying 7 2GB 32GB Android 6.0 Head Unit
- Enhanced ELM327 Bluetooth OBDII Adapter
- Torque Pro Software for Android
- Metra 70-8112 Stereo Adapter (70-1761 if not using factory amplifier)
- Polk DB Series Speakers
- Dometic CF110 Refrigerator
- Slee Headlight Harness Upgrade
- Philips 9012 HIR Low Beams
- Philips 9011 HIR High Beams
- Depo LED Smoke Taillights
Misc Items
- Amsoil Gear Oil, Transmission Fluid, Brake Fluid, Bearing Grease, & Birfield Grease
- Shell Rotella T6 Engine Oil
- Terrain Tamer Front Axle Rebuild Kit
- Wit’s End Toyota “Blue” High-Temperature Fan Clutch
- Derale Power Steering Cooler
- Gates Charcoal Canister
- Wit’s End Radiator Hose, Rear Heater Bypass, & Clamp Kit
- Wit’s End Knuckle Stud Kit
- Hopkins 11143405 Plug-In Simple Vehicle Wiring Kit
- OEM Rear Axle Rebuild Parts from Land Cruiser Parts & Specialties
- OEM parts used whenever possible for baselining and general maintenance items sourced from Land Cruiser Parts & Specialties, Valley Hybrids, and my local Toyota dealership
Conclusion
Quite the scope of work and parts list! Each part was carefully selected for function, reliability, and cost. And with a build of this scope, everything must work together to achieve the desired result, certainly no easy task. Stay tuned for more build specifics coming shortly in Project Evergreen Part 2.
A full list of suppliers and parts is available here.
#evergrn97 #projectevergreen #fzj80 #fzj80on37s #slinkylongarmsuspension etc…..
Thanks for the write up. I look forward to part two. If you get really froggy some detail about the parts selected, for example did you go with new axel shafts because they were coming out for maintenance or because you were sure the stock ones would fail. 5.29 gears because they were as low as you could go or you knew it would provide exact same ratio as stock setup?
Good questions.
I replaced the axle shafts, quite simply, based on the intended usage. Those Toyo 37×13.50’s are HEAVY, as is the rig, so by upgrading to chromoly shafts front and rear I am just adding a little insurance. I don’t drive like a maniac offroad so they should last a good long while.
As for the 5.29 gearing choice, its simply the “right” gearing for the trucks intended usage. Highway speed and associated engine RPM is fine (75 mph around 3k rpm), tows a trailer great, can still make it up a hill without downshifting all the time, and offroad it gives me the an excellent ratio for the technical stuff. The only change I plan to make in the near future is to rebuild and retrofit the transfer case with a set of 4:1 low range gears for a really nice crawl ratio.
Looking forward to hearing more about this rig and it’s story. Curious though, what did it cost to buy? Was it worth it, price wise?
It was very worth it IMHO. I will say that the purchase price of the rig was not unreasonable at all, and definitely in the ballpark of where I have seen some far more “worn” vehicles sell for. And its the little things like seals and gaskets being nice and pliable versus cracked and broken that make you assign worth to something like this. So many little things are simply “nice” versus another small headache that will nickle and dime you to death. But of course there are still items that need replacement simply due to age so I don’t mean to imply low mileage is the only consideration or that it means there is no work to be done.
Well, value is in the eye of the beholder. What I can say with 100% certainty is that working on a low mileage and indoor kept rig is a heck of a lot easier than the alternative(s). Starting with a solid platform is worth it IMHO as I can worry about the upgrade, not the base.
I’m so impressed with your patience to complete your project. Approximately how have you spent for this project if you don’t mind.
Do you have any issue with wind noise, if so please give details on how tou resolve it .
Thanks you !
Thanks! So the answer is no, I am not willing to share how much I spent on this build. What I can say, and can be seen from the list of parts and labor, is that it was done “correctly” and reliability is not an issue. I committed to the project the second I bought the base rig so essentially whatever it cost, within reason, was going to be the amount spent. I see far too many rigs built to the 75% point due to budget shock and they are just lacking in many aspects.
As for wind noise, no, I do not have any at all. The Prinsu rack is EXACTLY what I was hoping it would be, extremely sturdy and completely silent. I have owned other brand roof rack that were not silent at all…